
Gaming has become an increasingly popular part of what we do with our Macs and iOS devices, and Apple finally realized that. In iOS 5, the company introduced Game Center, a social network service and set of frameworks that developers could use to handle common gaming-related tasks, such as tracking friends, accruing achievements, and playing multiplayer games.
Chances are you’ve encountered Game Center’s green felt background on one of your many Apple devices. Maybe it popped up when you were trying to start a game of Letterpress, perhaps you got a notification letting you know it was your turn, or maybe you were just wondering about that multicolored icon Apple dropped on your home screen. If it had your confused, don’t worry: Let us walk you through how to get the most out of Apple’s online gaming service.
What’s your handle, good buddy?
The first thing to do is to create a Game Center account by launching the service on either your Mac or your iOS device. Regardless of where you choose to create the account, it will be accessible on both iOS or OS X, and the options you’re presented with will be the same.

Among the most crucial decisions you make when creating a Game Center account is picking a nickname. This is the name you’ll be known by online, and it will show up in leaderboards and in multiplayer games. You’ll want to pick carefully—once you’ve created it, you can’t change your nickname without making an entirely new account, in which case you’ll have to go through this whole procedure again.
While creating your account, you also have the option to make your profile public or private. If public, your profile (and your real name) will be visible to others on the service, Game Center will provide you as a recommendation to other users with your real name, and your nickname will be used in public leaderboards.
There’s also an option to upload your contacts in order for Game Center to provide you with friend suggestions. More on that below.
Once you’ve chosen your nickname and created your profile, you can add a couple of pieces of personalization: namely, a photo and a status.
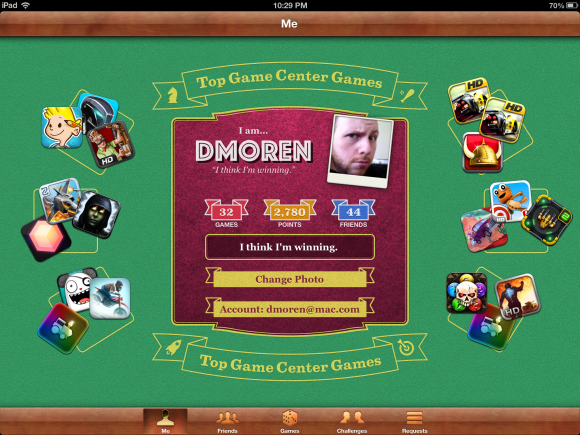
The photo’s pretty standard, but keep in mind that it’ll be seen by your friends or anybody you play games with, as well as anybody who views your profile if it’s public. You can assign one by tapping or clicking on the photo on the Me screen, and either choosing from your picture library or snapping a new photo with your device’s built-in camera.
A status is a short message on your profile—think of it like a Twitter update or Facebook status. It really just gives a little bit of flavor to your account, for those who happen to come across it. You can change it at any time by typing a new message in the text field on the Me page.
Friends and foes
Okay, Game Center doesn’t actually support foes—wouldn’t that be cool though?—but it does let you maintain a centralized list of friends. This way, you don’t need to recreate your friend list or send pesky invites to your pals every time you try out a new game. However, you’ll still have to do this once.

As mentioned above, when you create your account you’ll have the option to upload your contacts to Game Center in order to get friend suggestions from among those you already know. This is a good way to help seed your list of potential friends.
If you choose not to upload your contacts when creating your account, don’t worry: You can do so later by going to the Friends item on the toolbar, scrolling to the bottom of your recommendations, and choosing Use My Contacts.
On that Friends screen, Game Center will recommend to you a variety of folks you should befriend, whether because you have friends in common, they’re in your contacts, or just because Game Center thinks you’re compatibile. For each user, you’ll see what friends you share and how many games you have in common. (You won’t be able to view which games users play or who your noncommunal friends are without becoming their friend, however.)

To actually add a contact to your Friends list, you’ll need to invite them. Tapping on any user’s profile will show a Send Friend Request banner; tap that to send them an invite, which you can personalize with your own message. You can also send a Game Center invite to an email address, in case one of your friends doesn’t have an account yet; just go to the Requests screen and tap the plus-sign button (+) to create a new invite.
Once you’ve made a new friend, you can browse their full list of games and see how many points and achievements they’ve earned, as well as where they’re ranked on the leaderboards in regard to you. That’s always good for bragging rights. And if you’re looking to prove your mettle, you can even initiate a head-to-head challenge. (See below.)
Of course, if you ever want to remove a friend, you can do that to by going to their profile, scrolling down to the bottom, and choosing Unfriend. You’ll also see a Report a Problem button, if you happen to encounter someone who is behaving in a unsporting or rude fashion (none of your actual friends, we’re sure).
Gameology
Games in Game Center?! I know—crazy talk. But to take advantage of Game Center, you’ll need some games that actually support it. Fortunately, this is one area where Apple has focused a lot of effort.
On the Mac and the iPad versions of Game Center, you’ll see a host of the most popular Game Center-enabled games appear on the Me screen, the icons “dealt” in as though cards on a poker table. On iOS, tapping any icon will open an App Store panel where you can see information about and purchase the game (on the Mac, clicking on an icon will open the Mac App Store and take you to the game’s page).
There’s also a Games screen that you can access from the toolbar, which will provide you with a list of Game Center-compatible games that you have on both iOS and OS X, as well as a list of recommendations for the appropriate platform.

Selecting any game from these lists will display your rank and your achievements, if relevant, as well as leaderboards for today, this week, and all time. In each, you can tap or click on any player to see how they stack up, and to send a friend request if they’re not already a friend, or send a challenge if they are.
The leaderboards differ from game to game, and can be selected from a drop-down menu. You can also launch the game right from Game Center by clicking Play Game, or tell a friend about it, which creates an email message with a link to the game’s App Store entry.
Challenge accepted
Playing with (or against) your friends is one of the most basic attractions of games. While in the past that might have meant just scanning the leaderboards to see where you rank, Game Center now lets you issue specific challenges to your friends, inviting them to see if they can best your score or garner a specific achievement.

The task of issuing a challenge isn’t always obvious. There’s a Challenges screen available from Game Center’s toolbar, but it lists only challenges that others have sent you (which you can choose to Decline if you decide you’re just not going to rise to the bait).
But to actually throw down the gauntlet to one of your comrades, you’ll want to go to the Games screen and choose the avenue for your ultimatum. You can select either a leaderboard or an achievement; if you opt for a leaderboard, just select your friend’s name where it appears and choose Send Challenge. You’ll be prompted to personalize your challenge and send it on its way.

If you’ve earned a particularly difficult achievement and want to see if your friends can measure up to your awesomeitude—I coined that just now—then select the Achievements section of the page for the relevant game and pick any achievement. (Hint: You can also pick unearned achievements if you want to race with your friends to see who can be the first to grab it.)
When you select the achievement, pick Challenge Friends and select the friends you’d like to challenge—in the case of achievements, you can pick more than one. Game Center will tell you which of your friends have the game, but you’re not limited to just challenging them. It also tells you which of your friends already have the achievement.
Once issued, challenges show up in the Challenges screen of Game Center. If you’re willing to take up arms, you don’t need to do anything other than fire up the relevant game and try your darndest to accomplish whatever you’re setting out to do. If you’re not up to it, then you can, as mentioned earlier, choose Decline from the Challenges screen.
Unfortunately, the Challenges screen doesn’t list challenges you’ve sent to other players, so there’s no way to track the progress of your friendly rivalries.
Room for improvement
Game Center handles a lot of the common tasks iOS users deal with in gaming, but there’s still room for it to grow. Last year, I noted a few features Game Center was still lacking; some of those, like syncing progress between platforms, is now possible, while others, such as increased customization and a built-in text chat system (one that’s not iMessage), are still missing in action.
With Game Center, Apple has a captive audience. The company has chosen to press this advantage by building in frameworks for commonly used features like turn-by-turn games, but they’ve done little to make Game Center attractive as a place for users to actually spend time.
Still, there are things to like about Game Center, and the more that people try to use it, the more likely it is Apple will attempt to address its shortcomings.
Author: Dan Moren, Contributor

Dan has been writing about all things Apple since 2006, when he first started contributing to the MacUser blog. A former Macworld senior editor, he's now a freelance tech journalist, a prolific podcaster, and the author of several books; his latest is the supernatural detective novel All Souls Lost.